
Return to: Deep-Six Home Page
Return to: The Endless Pool Page
E-MAIL Deep-Six , or call (845-255-7446)
Move down the page to see the AQUASOL WATER QUALITY SYSTEM
MAINTAINING ACCEPTABLE QUALITY WATER
IN YOUR SWIMMING WATER
Points to consider about your Pool:
Call Deep-Six if you have questions (845-255-7446). Advice is free.
The water level in the pool should not get too low. Keep the level about 2/3 up from the bottom of the skimmer opening or, with a floating skimmer the water should enter the top so floating particles are swept into it. If it gets too low the skimmer will start taking in air and that creates noise, poor filtration, and in some cases an air-bound pump which is really bad. If the water is allowed to get too high in the pool the water may overflow the pool. Alos when it is too high the surface water will not go into it.
The water in a pool MUST be kept in good swimming condition. IT IS EASY TO DO. Chemically it MUST test safe for bathing. You should have a test kit that allows you to make sure the water in your pool is of good quality. The test kit probably has a plastic comparator and chemicals with various colored tops. Test strips might be used but the liquid chemicals are more accurate. Look closely at the comparator. There is a large test tube on one side. There is a small tube on the other side. The large tube has a 25 ml mark in the middle of the side of it. The small tube has a 9 ml mark about 1 cm. down from the top on the side. Those are the only levels we will be dealing with. Between the two test tubes there are colors that are used to make sure your pool water is chemically satisfactory. The colors in the middle are the ones that should be matched. KEEP NOTES ON EVERYTHING THAT YOU FIND.
1. You must make sure the water is sanitary. Germs introduced by swimmers must not be allowed to survive in a pool. Organic matter introduced by swimmers must be decomposed and eliminated. Algae should not be allowed to thrive. Killing evil agents is a key to good water for swimming. Every pool requires a sanitizing agent. Whether it is chlorine, bromine, Bacquacil, ozone, Clorox, the CL Free system, the introduction of a killing agent and maintaining its level is extremely important for the water to look clear and clean.
If you are using the LaMotte test kit it has 3 yellow-topped tubes. You will use only the first 2, R-0001 and R-0002, to make sure the chlorine or bromine is at the level that is proper. Rinse the small tube with the pool water. Now fill the small tube to the 9ml mark (see above for where that is). Add 5 drops of the R-0001. (Officially, droppers are designed to yield the proper size drop when the dropper is held directly upside down - not sideways.) Add 5 drops of the R-0002. Mix the tube's contents and look at the color that is produced. If it matches the middle pink on the comparator scale your water has the proper level of sanitizing agent. If the color is low, or there is no color, you must immediately add sanitizing agent. If you do not do it the water may become milky and is not sanitary. If the color is too pink you must cut back on the amount of chlorine or bromine you have been adding to your pool.
If you use Orthotolidine to test for the chlorine or bromine fill the small test tube to about 1/2 and add 1 drop. A middle yellow is good. No color means add sanitizer and an orange represents excessive sanitizer.
Note: If you use the yellow canisters of Nature2 in your pool please read the section below that follows the 2 pictures of Nature2. The chlorine level is good at the pink color under the middle one.
2. The pool water should not be too acid or base. If the water becomes too acid the metal in the pool, even the "stainless" steel, and the underwater hidden hydraulic motor, may start to rust. The copper heater coil in the pool heater will disintegrate. If the water gets too basic the water may become unsanitary because the chlorine or bromine may not be affective. No matter what, it is important to keep the water satisfactory for swimming and good for your pool and skin. To make sure the pH (acid/base) is proper you need to put the sample of pool water about ½ of the way up the small comparator tube. Add 1 or 2 drops of the red R-0004. Mix and observe the color. Yellow is very bad. The water is too acid. Red indicates the pH is too high. Orange is ideal. If you have a yellow color because the pH is too low, add 1 cup of the pH Rise (pH Up, sodium hydroxide, sodium carbonate, etc.). If the color is red add ½ cup of the pH Down (Sodium Bisulfate) or 1/4 cup of muriatic (hydrochloric) acid. Slowly add the chemicals around the pool into the water. Then rinse the cup in the pool. Retest the pH to see if you have made the result orange. If not, add more of the corrective chemical. DO NOT allow chemicals to remain on the liner.
3. Alkalinity is a pool water factor that some people treat as not being important. That is not true. Alkalinity keeps the pool water at a consistent pH. Without the proper alkalinity (about 120 ppm) the pH may go crazy from one swim to the next. Low alkalinity values cause the pool water to become corrosive. Even stainless steel will rust. Alkalinity is increased by adding common and ordinary baking soda to the pool water. Baking soda is known to the chemistry guys as Sodium Bicarbonate. The container may be called "Alkalinity Rise" or "Alkalinity Increaser". The chemical formula is NaHCO3. The Na is sodium, the H is hydrogen (or "bi" in the chemical world). And the CO3 is carbonate. You need baking soda in your pool. You are wasting a heap of money if you buy the product from a pool store. Get it in quantity when yours runs low at a Sam's, BJ's, or a Costco outlet.
With the LaMotte kit fill the large comparator to the 25 ml. mark. Using the green-topped test chemicals, add 2 drops of R-0007, 5 drops of R-0008 and then mix the test tube contents. Now we are going to titrate. Titration means we are going to add the 3rd chemical drop-by-drop, and counting each drop, until there is a color change. You will notice the color of the solution in the comparator is green. We are going to titrate until it turns (and stays) red after mixing. Add a drop of R-0009. Mix and look at the color. No change? Add another drop. Do that until the color becomes red. Twelve drops is what you want. Under 12 drops means you need to add baking soda (alkalinity). Each drop equals 10 ppm. You need 120 ppm. As an example, if it took 6 drops to change the water from green to red you would have 60 ppm of alkalinity in your pool. You need no less than 120 so add 1 cup of baking soda (Alkalinity Increaser) to the water in the current. Test again after the current has run for a minute or 2 and see what you have achieved.
4. The fourth (and last) chemical needed in indoor pool water is the calcium level. Simply, this is a measure of the water's hardness. Hard water is good for pools and is good for you to drink. Unlike soften water which replaces the healthy calcium and magnesium with unhealthy salt or sodium chloride. Low calcium levels in pool water increases the corrosion potential. Your pool should have at least 180 ppm hardness.
Using the LaMotte kit fill the large comparator to the 25 ml. mark. Using the blue-topped test chemicals, add 20 drops of R-0010, 5 drops of R-0011 and then mix the test tube contents. Now we are going to titrate. That means we are going to add another chemical drop-by-drop, and counting each drop, until a color change becomes permanent. You will notice the color of the solution in the comparator is red. (If it is blue at this point you are testing softened water that has no calcium. Skip the titration process.) We are going to titrate until it turns (and stays) blue after mixing. Add a drop of R-0012. Mix and look at the color. No change? Add another drop. Do that until the color becomes blue. Eighteen drops is what you want. If it takes less, than you need to add Calcium Increaser. Each drop equals 10 ppm. You need at least 180 ppm. As an example, if it took 14 drops to change the water from red to blue you would have 140 ppm of hardness in your pool. You need no less than 180 so add 1 cup of calcium carbonate (Calcium Increaser) to the water in the current. Test again and see what you have achieved. A hardness over 180 ppm is OK.
The pH and bromine or chlorine should be tested frequently, possibly every day in the beginning of your pool start-up. You will be able to adjust the testing frequency after a few weeks and you come to know how your pool water behaves. The alkalinity should be tested weekly after you have achieved the desired level. The calcium changes very little over time but should be tested on a monthly basis.
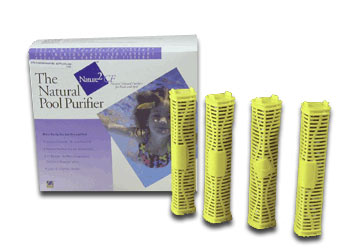
The above pictures are of the Zodiac Nature2 Mineral Pool Sanitizers. They usually come 4 to a box with a plastic top and bottom holding them together. Sometimes they are blue, not yellow but it is the same product. In large pools, such as those found at schools, colleges, etc. 4 of the cartridges are placed in the water filtration system (such as the inside of the filter). In Endless Pools 1 or 2 are placed in the water quality such as inside the larger filter canister, or tie-wrapped so they are underwater. In large pools 4 cartridges last about 4 months. In Endless Pools 1 lasts 3 months, 2 last 6 months, and 4 last for about 1 year.
If you are using the Nature2 cartridge(s) you must use chlorine. They will not work with bromine because silver and bromine make the pool water cloudy. The ingredients inside each cartridge consist of small pellets containing silver and copper. As the pool water is in contact these cartridges it picks up silver and copper ions and puts them in the pool water. Silver kills bacteria (that is why silver/mercury fillings in your teeth were so effective.) and copper kills algae. The combination of the two goes a long way in keeping your pool water sanitary. However, the beads are not 100% effective. Therefore, it is important to add chlorine (Clorox) to your pool water to keep the level at the lightest pink (0.5 ppm) on the test scale. In the long run you will be saving money and creating less chlorine odor using the Nature2 cartridges but they must be changed according to the above schedule. The Nature2 sanitizers contain 3.51% metallic silver (from silver nitrate) and 8.23% copper sulfate pentahydrate as the active ingredients.
Clearwater Blue offers copper additives and copper test strips. Contact Deep-Six for more information and/or for a sample strip. The following is the comparison charts for the Clearwater Blue test strips:
![]()
CL Free Water Treatment Systems - No chlorine, bromine, biquanides to sanitize your spa or pool. Swim in pure sanitary water.
There is another chemical that is used where there is excessive sunlight such as an outdoor pool. Sunlight causes a major chlorine loss. To reduce the affect, Cyanuric Acid is added to outdoor pools until the level reaches 40 - 100 ppm. (That may be tested for using the white vials in the Taylor Kit.) A good level is 50 ppm. Excessive amounts will cause the chlorine to become less effective in sanitizing the pool water. the only way to reduce excessive Cyanuric Acid levels in pool water is to change the water.
As time passes and chemicals (from swimming, evaporation with water additions, and pool chemical additions) are added to the pool water it will become more salty. The amount of salt in water is referred to as the "Total Dissolved Solids". Test kits do not usually have chemicals to determine the TDS, but pool stores might. The maximum level of TDS in a pool is 1500 ppm. Too much salt may cause deposits on the pool walls, in the pool plumbing, and in the heater and filter. Tap water might be 100-300 ppm. The threshold for fresh vs. salt water is 1000 ppm although one cannot taste the salt at that low level. Pools that are sanitized by a salt system are about 3000 ppm. The ocean averages about 35,000 ppm TDS. A pool water change is necessary to lower the TDS.
The water quality system consists of several components that might vary slightly from one pool installation to another, but the differences do not change the required outcome. The water comes from the front of the pool via 1½" white PVC pipe and enters the front of the pump. It will have passed through the skimmer which will collect floating objects in the pool. A few particles will get through the skimmer basket and may get caught in the basket at the front of the pool pump. (Check both baskets periodically to clean them.)
The Filter:
The water is forced out of the pump into the filter. Inside the water is forced to pass through the filter media. This is a cleanable and/or a replaceable item that captures very small particles and removes them from the water. It will get dirty as time passes. The media may be a pleated and porous material that lets the water through. It may be a powder such as DE that coats cloth-like surfaces. As particles are removed the water has a harder time of passing through the system so the filter media must be changed or cleaned. If the filter gets too clogged the internal pressure will be excessive and the pressure after the filter may get so low the heater will not turn on and the pool water will not get filtered enough. How much dirt the filter removes from the pool water depends on many factors: Indoor pools stay cleaner. Pools in dusty conditions collect dirt more often. People using the pool with dirty feet, bodies, kids, etc. will have to clean the filter more frequently. A dirty filter may lead to cloudy water and poor filtration. Poor filtration may lead to the loss of chlorine or bromine because of low water flow.
If the filter canister has a pressure gauge, you should note the reading when a new filter is put in. It is usually about 10 psi. Either make note of that pressure. On some pools there is a dial on the pressure gauge with 2 arrows. The lower of the 2 arrows should be placed on the pressure indicated when a new filter is inserted in the canister. When the pressure rises to the second arrow (or 10 psi above the starting pressure), and this may take 6 months or more with indoor pools, it is time to clean the filter. If there is no gauge the filter cartridge must be inspected in the light. New filters are usually clean and white. If it has particles or looks dirty it is time to clean or replace it. DE filters indicate a need for cleaning when the flow into the pool is low or the heater will not come on.
Some pools have the filter(s) connected to the skimmer. These should easily be removed and replaced or cleaned. Reach into the skimmer and remove them . The lower one has a plastic tab making it easier to grip it. Pull them out the front of the skimmer for cleaning or replacement. Replace them back in the skimmer and reattach the door. Some of the filters are smaller and will have to be cleaned or replaced more frequently.
Vacuuming the Pool:
Your Endless Pool should have a vacuum system. It may consist of a vacuum hose, a vacuum head, and a handle that extends from short to long. The water quality system is used to vacuum. The vacuum head is passed over the benches and then the pool bottom in order to pick up particles that have been introduced into the pool such as sand, insects, and lint. How often you need to vacuum will depend on how often debris is noticed on the bottom, as well as the owner's tolerance. Outdoor pools will need to be vacuumed more frequently. Newer pool owners should use a portable vacuum system. See the information below.
If you own a Pool that has a large Water-Quality more (3/4 HP or more) vacuuming may be done as follows:
Pull the skimmer door open and take the skimmer basket out. Turn the water quality pump on. Attach the vacuum hose to the vacuum head. Attached the vacuum handle to the vacuum head. It is important to get all the air out of the vacuum hose before attaching it to the water quality system. Put the free end of the vacuum hose into the stream of water that is entering the pool at the front on the left side of the propulsion housing. The water coming into the pool will be shot into the vacuum hose. The air will be forced out through the vacuum head as will be noticed by the bubbles coming from it at the bottom of the pool. Take the hose from the water stream, keep it under water, and more it over to the skimmer. Hold the skimmer door open. Move the vacuum hose end, keeping it under water, into the bottom of the skimmer and into the hole at the bottom. The water will now move from the vacuum head into the skimmer pipe and the pool may now be cleaned by the pool filter. With the vacuum handle move the vacuum head over the bench surfaces and the pool bottom. As the head is moved particles will be picked up from the bottom of the pool and will get caught. The pool surfaces will look clean when you have finished.
For Smart Pool owners: The battery-operated Catfish is a convenient way to vacuum the pool.
E-MAIL Deep-Six , or call (845-255-7446)
pH: 7.4 to 7.8; 7.5 is ideal Raise: Sodium Carbonate, Sodium Hydroxide (caustic but rapid); Lower: Sodium Bisulfate (somewhat caustic), Hydrochloric (Muriatic) (caustic)
Chlorine or Bromine: 0.5-1.5 ppm; Shock: 3-5 ppm
Alkalinity: 120 ppm (Baking Soda (sodium Bisulfate) increases it.
Hardness: Calcium (Ca++) and Magnesium (Mg++). Ideal is 180 ppm. Hardness Increaser or Calcium Carbonate is used to raise it.
DAILY:
· Check the chlorine or bromine level to be sure it is between 0.5 and 1.0 ppm. Use the Taylor test kit and match the middle color, or a middle yellow with Orthotolidine. If the chlorine or bromine level becomes too low, critters and algae will grow, and the water may suddenly get cloudy (white). The level of chlorine may be lowered using the Nature2 (silver/copper ion) system. Do not use silver/copper ion system with bromine. Nature2 users should keep the chlorine at 0.5 ppm or a light yellow.
Free Chlorine/Combined Chlorine
The difference between Free Chlorine and Combined Chlorine is without a doubt the most misunderstood facet of pool water maintenance within the industry. Whenever chlorine is added to the water, what is being added is Free Chlorine. Free Chlorine mixes with the pool water and seeks out substances that are detrimental to the water quality of the pool (algae, oils, sweat, etc.). Once Free Chlorine encounters many of these materials, it binds itself with the material and changes into what is called Combined Chlorine (AKA chloramines). Combined Chlorine then is removed from the water when the pool is shocked. The difference between these two chlorine forms is monumental. Simply put, Free Chlorine is "the good chlorine;" Combined Chlorine is "Bad Chlorine." It is important to remember that Free Chlorine, in the 0.5 to 1.5 ppm concentration, does not cause the pool water to emanate a bleach odor. Nor does this concentration of Free Chlorine cause the pool water to sting the swimmer's eyes. Combined Chlorine, however, does both: smells strongly of bleach, and stings the eyes. Due to these effects, if you have a client with an pool that smells strongly of bleach, and is stinging their eyes, the solution may be to add a chlorine shock to the water. Testing the Free chlorine level prior to shock is still advised.
Stabilized Chlorine/Unstabilized Chlorine/Bromine (See information below about all the sanitizers)
Chlorine dissipates very quickly when exposed to sunlight. For this reason, pools that are installed outdoors should be chlorinated with what is known as "Stabilized Chlorine." Stabilized Chlorine has an additive, cyanuric acid, which is bonded to the chlorine. The cyanuric acid serves as sunglasses for the chlorine, protecting the chlorine from breaking down due to exposure to ultraviolet rays. In an indoor pool, stabilized chlorine should not be used. Cyanuric acid stays in the water after the chlorine has been used up, and is only removed by changing the water. High concentrations of cyanuric acid within pool water can cause several problems, the most noticeable being an orange grunge that is often mistaken for algae. A good rule of thumb is that Stabilized Chlorine is for outdoor pools, and Unstabilized Chlorine is for indoor pools. Exceptions to this rule would be sunroom installations or other indoor situations where sunlight will be shining directly on to the pool while it is uncovered. Note: Bleach is an Unstabilized Chlorine. Bleach may not be dramatically affected by sunlight if used outdoors, but we would advise that Stabilized Chlorine be used if a client cannot keep a Free Chlorine residual in an outdoor pool using bleach.
Check the pH of the water. The test kit has phenol red (R-004, red cap) to do this. Fill the smaller test tube with pool water and put in a drop or two of R-004 and mix. The phenol red should turn orange when it is added to a sample of the pool water. If it turns yellow the water is too acid and it will corrode parts of the pool plumbing, and even the stainless steel benches and propulsion housing. If it turns red or pink the water is too alkaline the chlorine or bromine will not kill bacteria as effectively, and you will notice a disinfectant smell in the pool area. Note: If the color changes rapidly from any of the the colors above to a purple it means you have too much bromine in the pool.
Check the temperature of the water to be sure the heater is doing the proper job. Too much heat (especially over 90 degrees) will drive bromine or chlorine out of the water and cause increased amounts to be added. That becomes expensive.
WEEKLY:
· Check the water level in the pool. If you allow the level of the water to get too low air will start to enter the skimmer and get into the pump filter pot and the filter. That will cause the efficiency of both to decrease. Even worse, if the pump is above the level of the pool water it may loose its prime. That could lead to a complete stoppage of water flow, loss of heating the pool water, decreased disinfection, and pump burn-out.
Check the Total Alkalinity. Raise Total Alkalinity by adding Sodium bicarbonate (baking soda). Lower Total Alkalinity by adding either Muriatic Acid or Sodium Bisulfate. Included with your pool kit are containers of Sodium Bicarbonate (Alkalinity Plus) and Sodium Bisulfate (pH Lower). More is available at any pool store. Follow directions on the containers keeping in mind that an 7' x 14' Endless Pool contains 2,500 gallons (some over 4,000 gallons or more with a deeper section or in larger pools) of water. Always add chemicals to the pool with the swim current running to ensure even distribution. Add less than you think necessary. Wait a few hours and test again. Write down how much you added, and the results after the chemical addition. Once you get this under control it may be possible to check this on a monthly, rather than weekly, basis.
· Check the filter basket in the skimmer and remove any debris that has accumulated. This is mainly for outdoor pools. Indoor pools may go for weeks without having a significant accumulation of debris in the skimmer filter basket.
MONTHLY:
· Vacuum the pool. For outdoor pools this may have to be done more frequently, even daily.
· Check the filtration pressure. When it reads 5 - 10 psi higher than the initial reading it is time to clean the filter.
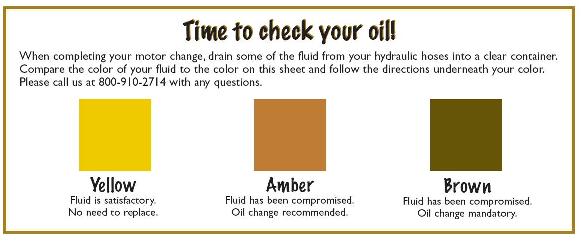
Endless Pools · Check hydraulic oil for color. Wipe some oil from the crankcase opening, dipstick, or a disconnected hydraulic hose on to a white paper towel. Check the color against the following chart. If it is not yellow but is brown the fluid must be changed.
CL Free Water Treatment Systems - No chlorine, bromine, biquanides to sanitize your spa or pool. Swim in pure sanitary water.
AQUASOL WATER QUALITY SYSTEM
What about installing a totally automatic system that will maintain the pH and chlorine levels without a hassle? Try the Aquasol System. The cost about $2000 for any pool. It keeps the chemicals at the precise level the pool, the spa, or the hot tub owner desires:
E-MAIL Deep-Six , or call (845-255-7446)


The Controller

The Sensors
E-MAIL Deep-Six , or call (845-255-7446)


E-MAIL Deep-Six , or call (845-255-7446)